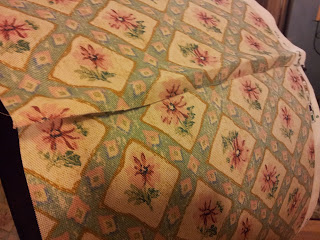
Covering a lampshade is a simple task that doesn't require any special skills, however, getting the end result right is important as the finished lamp is probably going to be put in a sitting room or dining room or somewhere that it will be on show. I recently covered the shade from my standard lamp using some pretty vintage style fabric that I came across among the 'bales' that I had in a storage chest that I keep all my fabric in and this is how I went about it:
What is needed
An old shade
Fabric
Dressmaking scissors
Straight pins
Roll of wrapping paper or an old newspaper
Sticky tape (if using newspaper)
Fabric glue (I use Copydex)
A pencil
The first thing that I did was make a pattern for cutting the fabric. I used a roll of gift wrap as it didn't require sticking sheets of newpaper together to get the correct length but newspaper is fine if you don't have a roll of gift wrap handy. Lay the roll of paper on the floor and starting with the seam of the shade, gently roll it along the paper while at the same time marking along the outer edge of the shade with a pencil until you reach the seam again. Do the same thing with the opposite side, while rolling the shade back along the paper. Add on 2.5cm extra each side and at each end add 1cm to the length for tucking in. Go ahead at this point and cut out your pattern using the pencil markings that you made and taking the 'hem' allowance into account. When you have done this, check the size by wrapping it around the shade making any adjustments that you need to.
Lay your fabric face down and using the straight pins, pin your pattern to the fabric using your pencil lines as guides. When it is pinned all the way down on both sides, use your scissors to cut the fabric using the edges of the pattern as your guide.

Next, lay your cut fabric face down and position the lampshade onto it at the seam. Glue along the seam of the lampshade and centre the fabric onto it pressing down gently along the seam. Leave for a few minutes, then put a thin layer of glue along the outside edge of the lampshade and leave it for a minute until it goes tacky and then ease the fabric around until you reach the seam again pressing gently all the way along. Do this on both sides of the lamp until it looks like this:
Then fold over the fabric for a neat edge (if you want you could iron this down before you start), gluing along the raw edge of the fabric that is already stuck to the shade and press down the neatened edge. Once this has been left to dry for a few minutes, you can go ahead and place some glue thinly along the inside edge of the lampshade one side at a time pressing the fabric into place firmly.
The end result is as seen above in the first pic. Hope you enjoyed my tutorial, please contact me using the form on the right hand side of the Home page if you have any questions or you can comment below. I am always delighted to hear feedback from my readers.


Wow fabulous, thank you for sharing. X
ReplyDeleteThanks so much for your comment Sinead, glad you like it.
ReplyDelete